Finding Your Way: Unlocking the secrets of Google Image Search

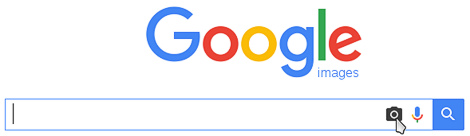
Where to find Google Image Search on the Google Search Page. You can also get there by doing a Google Search and clicking “images” on the menu across the top of the web-page.
For those that don’t know, Google offers a wealth of tools for finding illustrations useful to your adventure just by clicking on the “Images” button on the search homepage to enter Google Images. And, at first glance, it can seem fairly intuitive to use. But there are traps to be aware of, and some tricks that can definitely expand the usefulness of Google Images to the GM – at least until they radically change the programming again!
I promised a while back that I would delve into those tips and tricks for you, and with this article, I make good on that promise. So let’s get started…
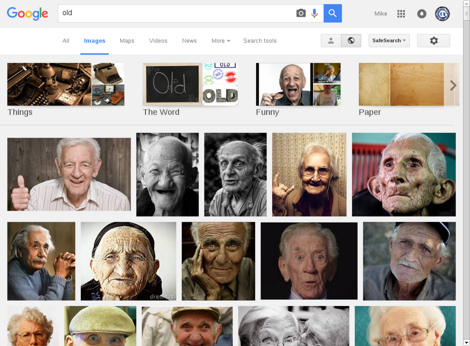
Google Image Search results for ‘old’ (click on this preview for a larger image)
Search Term
Google Image Search is not like an ordinary Google Search; operators such as “+[term]” (for must include) and “-[term]” (for exclude) don’t work, and searches inside inverted commas (“”) have a different effect to what has been the case with Google’s web search for quite some time, or are ignored (sometimes I think one thing, sometimes the other).
The results are all the images on any web page that uses the search term within the text of the page (and possibly within the metadata of the page). Where you get more than about 1000 results, these are sub-sorted by Google’s estimate of relevance.
You generally find the search results closest to what you are looking for in the first few hundred results. As a general rule of thumb, I consider results until I either find the “perfect image” for my needs, or until I reach the first patently ridiculous result PLUS THREE SCREENS FULL. This cuts the bulk of the nonsense results while retaining the majority of the valid results for consideration.
Vague Adjective Root
When constructing a Google Image Search, I generally start with a vague adjective that broadly covers what I want. This might be a genre, like “fantasy”, or a generally descriptive term for the subject. For period searches (routine when searching out illustrations for the Adventurer’s Club campaign, which is set in the 1930s), there are two that yield results: “1920-1940” and “1930s”. We tend to use the latter first, and only resort to the former if we don’t find what we want. The example shown uses the “root” adjective “old” for the search.
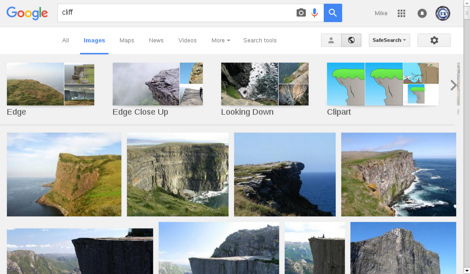
Google Image Search results for ‘Cliff’ (click on this preview for a larger image)
Sidebar: The Sub-search Strip
When there are a lot of results, Google will offer to refine the search by including a “strip” of term refinements for you to consider. I don’t know what the formal name of this part of the image search results page. Because it refines the image search, usually by changing the search term (but sometimes not), I think of it as the “sub-search strip”. I searched for the word “Cliff” (hoping that at least some of the results would be people named “Cliff” but didn’t get any). The options offered as part of the Sub-search Strip for this search are “edge”, “edge close up”, “looking down”, and “clipart”. There are more options if you click on the arrow on the right-hand side of the strip. These are the most common additional search terms that Google recognizes as being used with, or “going with,” the term currently being searched.
Now look back at the results for ‘old’ shown above. The options on offer are more diverse and less relevant to what we want:
- things
- the word
- funny
- paper
(more)
What that tells me is that I need to be more explicit in my search terms.
Some searches may produce text labels instead of, or in addition to, this strip of visual options – at least according to some reports that I’ve seen, though I’ve never encountered this behavior myself.
If any of the presented options do refine your search, click on them BUT BEWARE – there is no way back other than starting the search all over again. For that reason, I always RIGHT-CLICK on the option and “open link in new tab” (or the equivalent in whatever browser you’re using).
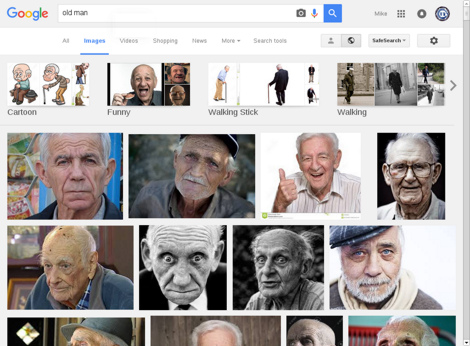
Google Image Search results for ‘old man’ (click on this preview for a larger image)
Adding a noun
My second step in specifying a search term is to add a noun belonging to the type of thing that I am searching for. I tend to use the most natural English in doing so, but I’ll go into search-term sequence later. Replacing “old” with “old man” has a profound effect on the results, as you can see. The results that have appeared are completely different to what we had before. Also note changes in the sub-search strip; the options now being offered are still not all that useful if what we want is a face, though, so I won’t use them at this point. More importantly, the sub-search strip’s continued presence means that I need to refine my search still more.
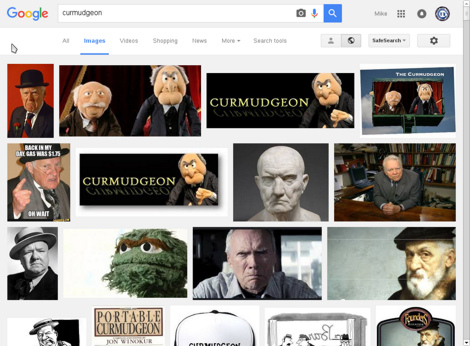
Google Image Search results for ‘curmedgeon’ (click on this preview for a larger image)
Sidebar: Getting Too Specific
Consider what happens when we replace the rather vague and generic search term “old man” with the very specific term, “curmudgeon”. Not one of the search results matches what we had before, and the sub-search strip has vanished.
Assuming that we’re searching for an image to depict an NPC, there are rather fewer viable results, indicating that this is probably an incorrect path, and we should choose a different way of refining the search, after extracting any that are worth considering – more on handling results later.
Whenever I’m contemplating a change in the search terminology, I always prefer to use a duplicate tab so that it’s just a matter of closing that tab if it’s a misstep. More frequently, though, I will simply make a mental note of the alternative search path and use it only if my needs aren’t met using the search that I already have underway.
So, why did this happen? What is the nature of the misstep, and why?
It goes back to what you’re actually seeing as search results. These are images extracted from all websites that match the search term somewhere in their content (or possibly in their metadata headers), sub-sorted by relevance if there are too many results, ordered by relevance either way. ALL images from those websites, whether they match the search term or not.
That means that the more specific your search term, the more ‘all or nothing’ the image becomes to your requirements. Using more general terminology gets more, and better, results because it’s fuzzier, and returns more results, enabling the relevant ones to bubble closer to the top of the search results.
It’s always worth trying a specific search when you want something specific. But you should always be ready to be more general and refine your search in another way.
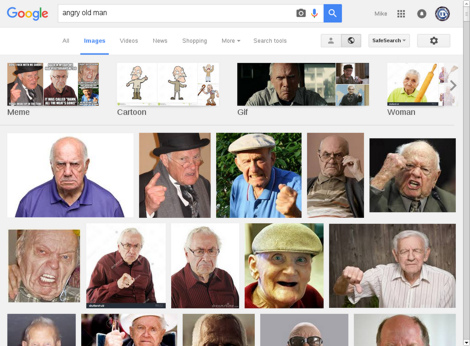
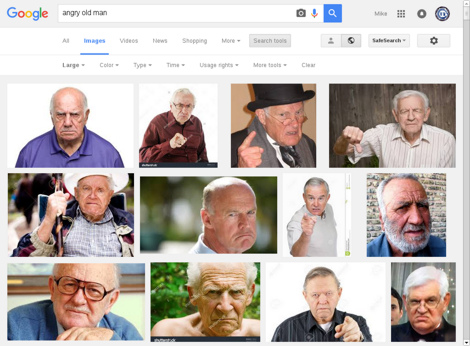
Google Image Search Results for ‘angry old man’ (click on this preview for a larger image)
A further descriptive element
So, I add a further adjective, one that is as unrelated to the original as possible. In this case, I have added the emotional term “angry”.
Multiple Search Terms
What happens in Google Image Search when you provide multiple search terms – “A B C D”?
You get the images from any web-page that has ANY of the search terms, i.e. “A or B or C or D”. These are in the order of n matches, then n-1 matches, and so on, where n is the number of search terms – so (in this case) it would be images from web pages in which all 4 search terms (A, B, C, and D) appear somewhere in the page, then those with 3 of these, and then those with 2, and finally, all images from web-pages that match just one of the search terms.
By changing the search to “angry old man”, I again transform the results. Note that I would normally create this search term complete (all 3 elements) before performing my first search!
The results being offered now appear completely different, because results matching all three of these terms would have been scattered throughout the original search results. Sometimes, you get lucky, and you can see the original search’s “top response” somewhere on that first page or two of results of the refined search, and sometimes not.
Things get more interesting when there are more results than Google is willing to provide. That’s about 3000-4000, maybe more. Under the original Google Image Search, you just kept loading more results, retrieving a set number of results from Google’s databases at a time. As I recall, the maximum was 50 or 100. This arguably placed less of a load on the hardware and software of the computer than what they do now – but because RAM has become phenomenally cheap (and so have disk drives), capacities have gone way up. So the new technique just keeps “growing” the same results page until you reach the cap that Google have set up, whatever that might be, or your browser crashes.
Also note the changes in the sub-search strip. The choices being offered have changed again. Still more refinement is needed to get the number of results down to something Google can manage in terms of providing relevant results. More importantly, they have changed in character. The results we are now being offered include things like “walking” and “walking stick”, indicating that we have a search that is now correct in terms of the subject matter; using a different form of refinement, image size, will be more useful than restricting what we want the “angry old man” to be actually doing in the image. But, before we head down that road, let’s talk about the effects of the search term sequence.
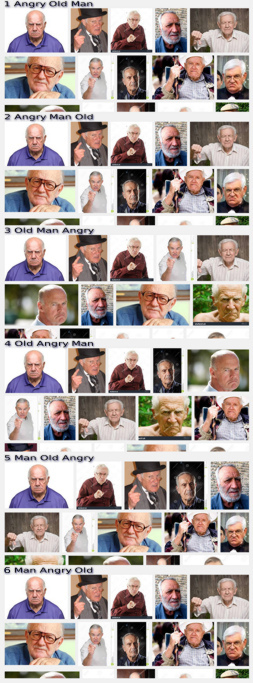
Comparison of the Google Image Search Results for ‘angry old man’, ‘angry man old’, ‘ old man angry’, ‘old angry man’, ‘man old angry’ and ‘man angry old’.
Does Search-Term Order Matter?
In theory, no. In practice, and in reality, absolutely – somewhat, with qualifications.
This image shows the first page of results for six different searches, i.e. the six different combinations of “angry,” “old,” and “man.” I have pre-empted part of the discussion below by restrict the results to large images just to hide the sub-search strip, leaving more space for results.
Right away, you can see that while the photos are mostly the same, the order they are presented in is quite different. And that’s the key to understanding my somewhat cryptic comments a moment ago; because, while a search with limited results is relatively unaffected, the more search results there are, the more that situation changes.
It’s when you get more results than can fit within Google’s maximum-results cutoff that things get really interesting, because that means that at least some (and potentially, a great many) results will drop off the results list, to be replaced by others that you would not get to see at all under the original search term sequence.
At the same time, notice that the first result is the same in all six searches. “Perfect Matches” are still “Perfect Matches”. In fact, the first two sets of results are identical for the entire page of results, and also identical to the sixth, at least on the first results page. So search order is a factor, but not the be-all and end-all of your search results.
Obviously, the deeper you go into the search results – the more screen-fulls down into the search that you look – the more scope there is for the “results churn” to have a substantial effect.

The standard Search Tools in Google Image Search (click on this preview for a larger image)
Search Tools
Besides refining the search with better search terms, you can also use Google’s Search Tools to exclude results that don’t match the parameters you’ve chosen. There are 6 tools to choose from:
- Size
- Color
- Type
- Time
- Usage Rights
- More Tools
and, once you actually set one of these Search Tools, you get a seventh option,
- Clear.
You reach these tools by clicking on the “Search Tools” button on the Image Search page as shown.
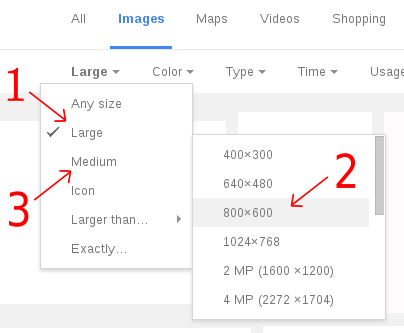
Google Image Search ‘Size’ restriction menu and sub-menu
Size
There are three settings that are of use when searching for images. The first choice, and the one that I normally use by default, is “Large”. This usually provides an image that is at least as large as my screen area (though that is often not quite the case with more modern wide-screen ratios).
Only if absolutely nothing even close to the results I want gets found will I move to option 2, which is in the “larger than” sub-menu; I usually choose the 800×600 option. Anything smaller is not likely to be useful, and we’ve already established that there is nothing very useful that is very much larger.
And, if that still doesn’t get me where I’m going, I’ll call up Medium results – and, if any of them match, I’ll use some of the tricks that I’ll discuss later to try to find a more useful version. But that’s getting quite a bit ahead of myself.
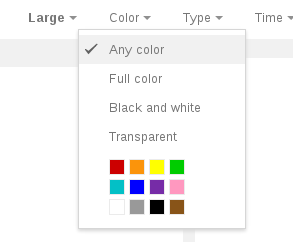
Google Image Search ‘Color’ restriction menu
Color
It’s very rare that this option is useful, to be honest, but there have been occasions when – for the feeling of period authenticity, and when I have many search results to choose from – I will select black and white; and there have also been occasions when I know that I want to create a composite image, that I will request a transparent background.
More commonly, when search for an image of a map, I will choose a black and white one if possible so that any markers that I add in color will immediately “pop” from the page.
Searching for an image that was designed to be reproduced in black and white often produces better results than one that was designed for color and then desaturated to transform it into gray-scale, also referred to as “Black and White”.
But, for the most part, and except for this limited application these don’t provide enough potential results to choose from, and I am better off asking for “any color” and using image-editing tools to do whatever I need to do with it.
The other color options specify the color that you want to dominate the image – again, generally less than useful.
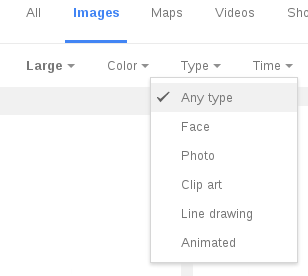
Google Image Search ‘Type’ restriction menu
Type
It’s rare that this tool is useful, but when it is, there is no substitute. The choices are “face”, “photo”, “clip art”, “line drawing”, and “animated”, and the latter is the only one that I haven’t used now and then.
I do find it interesting that choosing “face” can sometimes exclude faces, and include non-faces, and “photo” can include digital art. So the options are less than perfect, and only to be used when you simply aren’t able to get enough to choose from in any other way.
In fact, there are times when you are better adding “face” or “drawing” to your search terms instead; you often get results that way that don’t come up by using this tool – and vice-versa.
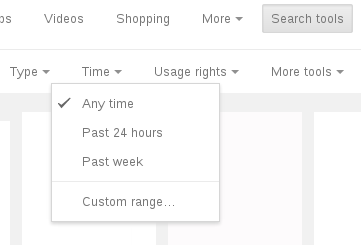
Google Image Search ‘Time’ restriction menu
Time
This doesn’t refer to the image, it refers to the date the web page on which it appears was last updated. When you’re looking for a specific, contemporary, image, this can be useful. When you’re searching for a subject that has experienced some profound change in public perception, this can also be useful in restricting your results to “before” or “after” the change. For example, an modern image search for pictures of Bill Cosby or Rolf Harris would bring up images very different to those representative of these people before recent scandals, accusations, and convictions. These aren’t all that useful in an RPG context, but there are rare occasions when it’s just the ticket.
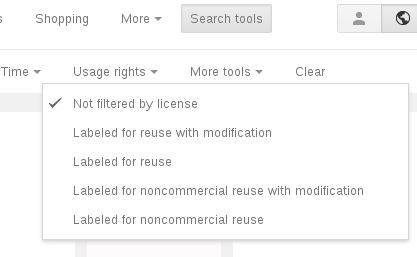
Google Image Search ‘Rights’ restruction menu
Usage Rights
This is one of the newest tools added, and it’s one that can be vitally important, though I’m still not sure how far I would trust it; my first preference will always be a supplier where I know exactly what the usage terms are.
If you are only going to use the image privately, there’s no need to limit this search term. If there is any prospect of the image being used for a public purpose, this should be something you consider. I certainly considered it when producing the illustrations for this article, but decided that for two reasons I would probably be okay; first, this would probably be okay under “fair use” provisions within copyright law; and second, I was simply documenting the results of Google’s Image Search, and as such, any fault was theirs and not mine. Nevertheless, I was paranoid enough about it to make use of this option when I reached the point of wanting to examine a result more clearly as part of this article.
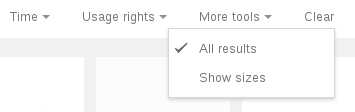
Google Image Search ‘More Tools’ selection menu
More Tools
It’s always seemed obvious that Google intended to introduce additional Search Tools – and yet, to date, there are only two options here: “All results” (as opposed to what? It’s not entirely clear what this turns off and what it doesn’t) and “show sizes” which toggles image size showing beneath each thumbnailed result, which is completely unnecessary but can be useful on very rare occasions.
Clear
Turns off any restriction that’s been set using a search tool.
Google Image Search results for ‘angry old man’, ‘large’ size (click on this preview for a larger image)
Refining the search: Size
So, let’s use the search tools to refine our search and see what happens. First of all, selecting Size “Large”.
The first thing that you should notice is that the Sub-search strip has vanished, because the number of results immediately plummets.
The second thing is that the first result of the search hasn’t changed, but the second result used to be in the second row of results, and the third result didn’t even appear previously. That means that of the first page of results at “any size”, less than two were at an ideal size to be seen on a computer screen at any distance – from across the table, say.
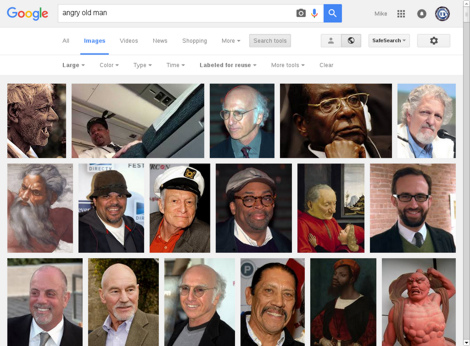
Google Image Search results for ‘angry old man’, ‘large size, ‘free to reuse’ (click on this preview for a larger image)
Refining the search: Usage Rights
For the first time, I have to do something that I normally wouldn’t; because I want to feature a couple of search results in detail, I have selected the rights option “free to reuse”, just to be a little safer in terms of copyright law. Tellingly, the first result didn’t appear at all on the first page of results that came up without the rights restriction.
It’s also worth observing that there are a couple of very recognizable faces in these results. The face on the top row, far right, looks vaguely familiar (I think it’s a British Actor, but I’m not sure). There’s part of the Sistine Chapel, and what appears to be Hugh Hefner, in the second row, and the third row has a photo that I think is of Billy Joel, followed by one that is definitely Patrick Stewart. The third face is also vaguely familiar, and I’m fairly sure the fourth is also an actor that I recognize. It’s also my suspicion that the third face on the top row is the same person as the third face on the bottom row, though they are clearly different photos.
As a general rule of thumb, I won’t use the face of anyone that I recognize unless that’s exactly what I was searching for, because if I know who they are, so might my players – and might impute all sorts of connotations to the character being represented that I don’t want. (That also works in the other direction – choosing a photo that belongs to someone they will recognize as a villain will imply things about the character that I may not want to be true, but which I might want the players to be suspicious of; and occasionally, for a very peripheral NPC, I might make an in-joke).
Of course, there’s always a risk that they will recognize someone that I did not, but that risk is impossible to avoid.

Selecting the first image result for ‘angry old man’, ‘large size, ‘free to reuse’ opens the image preview and Result Handling Panel (click on this preview for a larger image)
Selecting An Image
So, what happens when you click on one of the results?
A panel opens up in the middle of the search results page (which usually moves up or down as necessary to ensure that the result is within the viewing area of the window). The panel contains a triangle pointing to the thumbnail of the image in the original results.
On the left hand side of the panel, a preview of the image chosen comes up. If the image is larger than the available area, the preview will fill most of that side of the screen, depending on its proportions; if it is smaller than the available area, it will be shown “actual size”.
These previews are all “progressive”, which means that the image is initially shown in extremely approximate (and fast-loading) form and details then appear in greater clarity. Furthermore, these previews are all heavily compressed in file size – do NOT rely on the preview as a guide to the quality or sharpness of the actual image.
To the right of the preview are four areas of interest, and a couple of controls.

The function areas of the Result Handling Panel
Uppermost is an information panel relating to the Image, giving the name of the image and the name of the web page from which the image derives, separated by a vertical dividing ling. In this case, the name of the image is “Angry Old Man” – exactly what we searched for – and the originating website is “Flickr – Photo Sharing!”. Beneath that, there is the URL of the website, the size of the image, and an option “Search by image” that I’ll discuss in a little while. Finally, there is information on the image from the website, in this case that the image we are considering is the original image at the original size (2344 x 3080).
Underneath this are two action buttons – “Visit page” and “View image”. These are relatively obvious in what they do. But I’ll talk more about them in a moment, anyway.
Underneath that is a “Related Images” section that I will look at, in detail, later.
At the top right of the panel is a “close” hot-spot – click there and the panel will close back up, effectively taking you back to the search results. And, on the middle right, there is a button to move on to the next search result without the need to close and reopen the panel. After the first result, there would be a similar button on the left of the preview to move back to the previous search result.
There are also some hidden controls that I use quite a lot, which I’ll also get to in a bit.

The action buttons on the Result Handling Panel
The Action Buttons
Most of the time, what you will want to use is “View Image”. That opens a new tab containing the image that you’ve selected.
It doesn’t always work.
Sometimes, you will get a “forbidden” error. Sometimes, you will get a “hotlinking forbidden” graphic. That’s where the other action button becomes relevant. If you “Visit [the] page”, you often get a second, and even a third, bite at the cherry, if you need it.
First, you may find a link on the page that leads to the image. When that’s not obvious, or when the image as shown on the page is different in resolution to the one you expected and there is no link – so it’s not just a thumbnail – the next thing that I do is right-click on the smaller image (if there is one) and open it in a new tab; images are often re-sized, i.e. shown on a web-page at a different resolution to the actual image. I do it often simply so that I don’t get lines of text floating in mid-air (not to mention changing the way text is broken up into paragraphs).
But, even if that doesn’t work, by having the web-page open, you often signify to the hosting computer system that you now have permission to view the image – so, going back to the image preview panel and selecting “Open Image” a second time without closing the originating website can get you to the image permitted.
And, if that still doesn’t work, there is still one final pair of tricks to try. The first is to go up a subdirectory in the URL. This is real old-school stuff, so I can’t be sure everyone knows what it means; you have to understand the architecture of a URL.
A URL starts with an access protocol – usually http:// or https://. This is followed by a domain name, which may or may not have something in front of it, and will usually have something after it. www.campaignmastery.com is the domain name for Campaign Mastery; if the website was Australian, it would end in .com.au, if it were in the UK, it would be .co.uk, and so on. That’s followed by the directory within the website’s architecture where the file is located, and, quite often by a subdirectory within that directory, and a sub-subdirectory within that subdirectory, and so on.
Let’s say that the URL to the image you want to show is http://www.site.com/files/coolstuff/images/coolimage.jpg but you can’t get to it because the site won’t let you. The trick is to start taking bits of that URL away in hopes of either getting a directory view of the files or access to a web-page that lets you get to the image:
- http://www.site.com/files/coolstuff/images/coolimage.jpg
- http://www.site.com/files/coolstuff/images/
- http://www.site.com/files/coolstuff/
- http://www.site.com/files/
- http://www.site.com/
The last is quite obviously the URL of the website; you can’t go any higher.
This works because there are often default web-pages, usually called index.htm or index.html or default.htm or default.html or even home.htm or home.html, that display automatically unless specifically prevented from doing so by the website configuration.
And if that doesn’t work, the next step is to do the same thing explicitly:
- http://www.site.com/files/coolstuff/images/index.htm
- http://www.site.com/files/coolstuff/images/index.html
- http://www.site.com/files/coolstuff/images/default.htm
- http://www.site.com/files/coolstuff/images/default.html
- http://www.site.com/files/coolstuff/images/home.htm
- http://www.site.com/files/coolstuff/images/home.html
…and so on.
This technique can sometimes bypass the restrictions that have been set up and get you to the image that’s been promised. These tricks used to work a lot more routinely back in the late nineties and early naughties, but still works these days – at least often enough that they are all worth keeping in your repertoire of tricks.
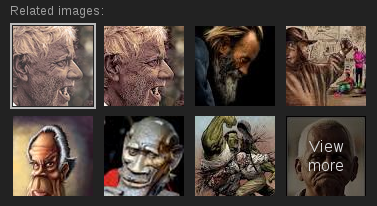
The ‘Related Images’ sub-panel on the Result Handling Panel
The ‘Related Images’ Sub-Panel
The ‘related images’ section of the Result Handling Panel uses the title of the image selected and displays the top 8 results.
These can be the same image in a different size, or it may be an image that also appears later in the full search results, or it may be a completely unrelated image.
Related Images completely ignores any Tool Restrictions so it can also contain images that would be in your search results if you had not chosen various Tool Settings, i.e. be smaller than you had specified, or subject to different usage rights, or quite different in color balance, or from outside the time limits you had specified.
Sometimes, but not always, the 8th item will actually say ‘View More’ (it depends on how many ‘related images’ Google finds) – which is another “hidden control” that a lot of people don’t notice.
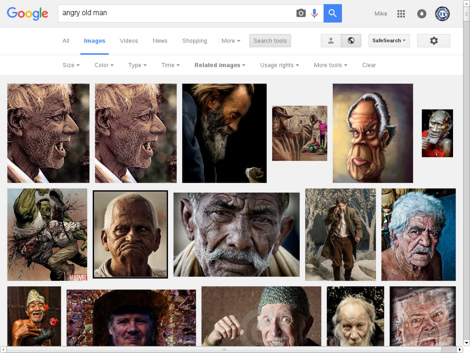
Selecting the ‘View More’ option (if present) for the first image result for ‘angry old man’, ‘large size, ‘free to reuse’ causes a new Image Search to occur based on relatedness to the base image IN THE SAME TAB (click on this preview for a larger image)
View More
If you click “View More” you get a new search in THE SAME TAB, and you may note that a new Image Tool has mysteriously appeared on the results page: “Related images”.
You might expect that these images are the same ones that have appeared in previous search results, and sometimes that will be the case – but most of the time it will be a completely new set of results. That’s because all sorts of parameters are used to assess how similar one image is to another. Everything from color balance to overall lightness or darkness is taken into account.
If anything, some of the results will appear farther down in the results of the original search; I’ve noticed this phenomenon many times, but never consciously observed the reverse, where a related image is one that has already appeared in the main results panel. I suspect that this is deliberate filtering by Google, but could be wrong.
The image accompanying this section shows what came up when I clicked on the “View More” Related Images. The first seven results are clearly those that were thumbnailed in the search result selection panel. But none of these results looked familiar, even after giving considerable attention to the details of the previous search pages.
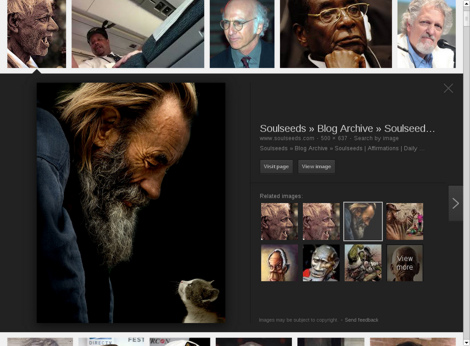
Selecting the third ‘related image’ to the first result for the image search ‘angry old man’, ‘large size, ‘free to reuse’ brings up the preview and Results Handling Panel for that related image (click on this preview for a larger image)
Selecting A Related Image
What happens if, instead of the “View More” related images, one of the options already presented appeals?
For example, the third ‘related image’ immediately caught my attention.
There’s an emotionally complex blending of happiness and sadness, and a sense of wisdom and weariness. It shows a lot of character, and that is always appealing when creating an NPC.
Clicking on the thumbnail brings the image up in the results panel, updating every detail to relate to the new image except the ‘related images’ panel.
Right away, I discover that the man is deeply regarding a cat, and that is the reason he is hunched forward, not grief.
In terms of usage, that means that I can either use the personality traits as they are revealed – ‘regards cats as people,’ or ‘talks to his cat as though it were a sentient person,’ or something like that – or I can easily digitally paint out the cat and preserve my original interpretation.
The information panel now tells me that this is an image from a blog, Soulseeds.com, and that the size is only 500×567. That’s really on the small side, which is why the result didn’t come up in the original search results.
That means that it’s time to try the first of the “hidden functions” built into the information panel.

The hidden ‘other sizes’ tool is located here
You access the first by clicking on the size information. That invokes a “search for similar images by size”.
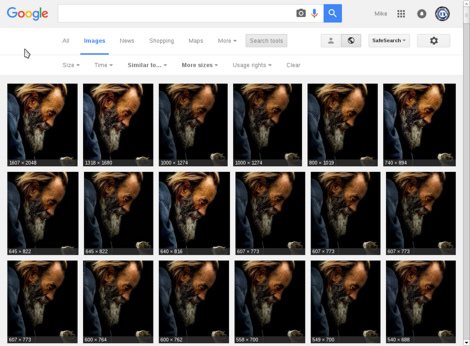
Clicking on the hidden “other sizes” tool creates a search in a new tab for other sizes of the chosen image (click on this preview for a larger image)
Search alternate image Sizes
Some people seem to think that Google always presents the largest version of any image that comes up in an image search. I always have trouble restraining myself from laughing when people suggest that. It’s absolutely not true, and this will prove it: clicking on the size in the information panel invokes a search for similar images by size, and to the side, you can see just what that produces. Unless something goes horribly wrong, a new search appears in a new tab.
As you can see, these are all different sizes of the same image, sorted by image size. Once again, a new tool has appeared in the search, one that reads “more sizes”, as well as the “similar to” tool that we’ve already encountered.
My laptop screen – my old one, at least – has a vertical resolution of about 800 pixels. Anything bigger than that suits me just fine; in this case, that means that any of the top row of results would be quite acceptable. And the entire first screen-full of results are larger than the original source image, so the odds that I will be able to access at least one of them is pretty good. But not perfect, and I’ll come back to that a little later.
Now, this result is a good one. Quite often you won’t get anywhere near as many results as this. Sometimes, you won’t get any alternatives, and sometimes there will only be a handful.
If there are no resolutions of the desired image that are large enough, I’m still not defeated. The reason is because a lot of content providers instruct Google not to index certain pages and therefore, Google Images doesn’t index the images. So the next thing that I look for are thumbnail sized images. If I find any, I use the “Visit Page” button for that image and see if there’s a link to the full-sized image.
And, if that still doesn’t work, it’s time to hit the “Search by image” hidden control.

The hidden ‘search by image’ tool is located here
Search By Image
This might be the last throw of the dice, but it’s by no means the least of them. This opens a new web search page (with a couple of variations from the usual one) based on the image as a “search term”.
Think about that for a second. If the final image is worth 1,000 words, the thumbnail might be worth at least 100 of them – the 100 that leads you to the image in question.

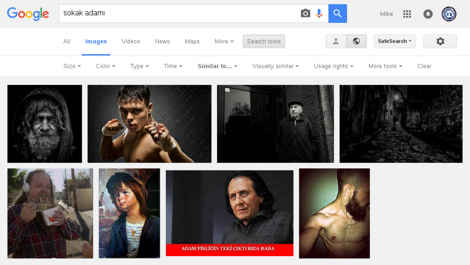
Clicking on the hidden ‘Search By Image’ tool produces this search results page in a new tab with six areas of interest (click on this preview for a larger image)
When you click on the link, this is the web page that comes up. As you can see, there are 6 elements that I have thought worth highlighting.
- The search window shows that you are searching based on an image by presenting a thumbnail of the search subject, adding the image type (jpg) next to it, and putting the whole thing in a brighter blue box. The search term itself derives from 4, below.
- The number of results are always worth noting when in this position. In this case, 428 is a very respectable number, but that’s not to surprising because we got quite a lot of results from the “other sizes” tool. Sometimes you will get a dozen or so results, sometimes even fewer – and sometimes (very rarely) you will get thousands. About 50 is the average, web-wide, in my experience.
- Speaking of the “other sizes” tool, this page gives another access to it – except that it’s not quite, because you have some additional options (all sizes is the default used by the “other sizes” tool, “large”, “medium”, and “small”. On rare occasions you may also get a “tiny”.
- From the page, the surrounding text, any EXIF information encoded in the image, the image name, and anywhere else that Google can think of, their systems come up with a best guess as to what the language=based search term is that would most reliably or accurately bring up the specific image in the results. In this case, it has presented a choice that might be the name of the man or of the photographer, “sokak adami”. This can be incredibly useful, as I’ll explain in a bit.
- “Visually Similar Images” are not the same thing as “Related Images”. The parameters are broader and fuzzier, and that can be incredibly valuable for the same reason as 4 above.
- Pages that include matching images is the section that we have, under the postulated hypothetical situation, come here for. Just because one site using the image has blocked you from accessing it doesn’t mean that they ALL will have done so. So work your way through the results in search of the image.
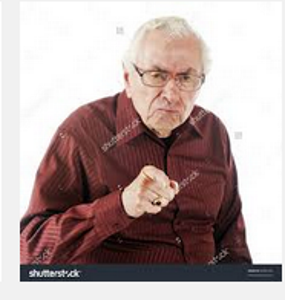
An image result that has been moderately defaced by watermarks
The irritations of watermarks
Quite a lot of times, the results of an image search will produce watermarked images. If the watermarks are not too odious, you can live with them, but more frequently, they are so obnoxiously placed that the image is worthless. I got rather lucky in terms of the results of the various examples I’ve used in this article; there weren’t too many, and the ones that were there were only “moderately” damaged in usefulness. Take the example shown here, which derived from the “angry old man” image search, for example. The face isn’t badly covered by watermarks, and that’s the main thing. I have seen other images which were covered in the watermarks of two or three different image providers, either in different resolutions of the image, or – occasionally – at the same time, in the same image.
You might think that the “other sizes” or “related images” would take you to any un-watermarked results; they usually don’t. Google’s search protocols are so exacting that the watermark is considered part of the image and any unwatermarked versions are too different. Ironically, the less damaging the watermarks are, the more likely you are to be able to locate a watermark-free image.
If there’s an image result that looks perfect, but is badly watermarked, start by going to the website; often a lower-resolution version will be offered without a watermark that might still be large enough for your purposes. But if that doesn’t work, there are a couple of tactics to fall back on, and they both require the “search by image” page.
The first is to search for the “best guess” in a completely fresh image search. If there are any unwatermarked versions indexed by Google, that will often find them.
Clicking on the “visually similar” link on the “search by image” results page causes this image search IN THE SAME TAB (click on this preview for a larger image)
The second is the “visually similar” results, of which the section in the “search by image” results page is usually only the tip of the iceberg. You get to the full set of results by clicking on the words, “Visually Similar Images”. This is what you get when I did so for the man-with-cat image. I always right-click on it to choose to open it in a new tab if I’m going to open it at all.
“Visually Similar” is sometimes very accurate and sometimes produces wildly improbably results. I see no resemblance at all in most of these to our search, for example. Where this is at its best is finding non-watermarked versions of watermarked images.
The camera icon in the Google Images front page opens the main ‘search by image’ popup (click on this preview for a larger image)
Speaking Of “Search By Image”…
Google has another couple of tricks up it’s sleeve.
If you go to the main Google search page and click on “Images” at the top of the page, and then click on the camera icon (it will darken as you mouse over it), you get a pop-up window with a couple of useful options for you. Both of these are also named “search by image”, and they are essentially front-ends for you to use Google’s “search by image” option on images other than those provided by a Google image search.

The search-by-image popup, ‘upload’ tab selected (click on this preview for a larger image)
Search By Image: Upload
The first option is for you to upload an image from your computer, phone, or whatever, and then use that as the basis for an image search.
I’ve mentioned a time or two that I maintain a clip art “library” of images collected from the web. These come from all sorts of places – Google Image Search results that weren’t quite what I wanted, Twitter, Facebook, Pinterest, things that I’ve stumbled across while browsing the web, and even some clip-art libraries – not to mention images that I have generated myself. I try and save versions at a size that makes them immediately drop-in useful, but that’s not always possible. If I have a small or medium image in this collection that happens to be just what I am looking for, I have two choices: I can describe the image, use that as the search term in an image search, and hope I get lucky; or I can upload exactly what I want to look for. Which of those sounds more likely to yield results to you?
This is also a viable option for repairing damaged images ,em>some of the time – upload the partially-corrupted image and search for an undamaged version.
Finally, if you take a badly-watermarked image, crudely paint out the watermarks, then reduce the image to about 1/20th if its resolution or 100 pixels wide, whichever is smaller, you can sometimes hunt down an uncontaminated image.
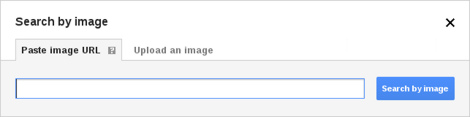
The search-by-image popup, ‘Paste Image URL’ tab selected (click on this preview for a larger image)
Search By Image: URL
Equally useful is the other tab, “Paste Image URL”. Imagine, for a moment, the following scenario: you are browsing the web when you come across the perfect illustration for some scene or character in your next adventure. The only problem is that it’s too small, and doesn’t link to a larger version.
All is not lost. Right-click on the image and look for “copy image URL” or something similar. It might not be there – I’ll deal with that complication in a moment – but most of the time, you’ll see it in the menu that comes up.
Open up Google, click on Images to get to Google Images, click the camera icon, and right-click and paste the URL that you’ve just copied into the search box. Hit enter, and you start a search for the image.
If the option isn’t there, and you’re using Google Chrome, you still aren’t necessarily beaten. Look for “Inspect Element” on the menu; if it’s not there, right-click on various other parts of the window to look for it. This will produce a section of the browser showing the code that makes up the site. Here, you have two tricks to try; if you know HTML, you can Control-F and search for “.jpg”, “.png”, or “.gif”; these are the common image formats used for the construction of web pages. Go through the results and try to identify the name of the image. The URL will probably be “relative”, which is to say, incomplete from the point of view of copying and pasting into your browser, but the name alone as a search term will sometimes yield results.
But, and this is my first choice, if you click on resources and look on the left-hand-side for images, then scroll through them, clicking on one at a time, you will often find the image you want, with it’s URL shown below it. Right click on that URL and “copy link address” or “copy link” – then you have what you need for an image search.
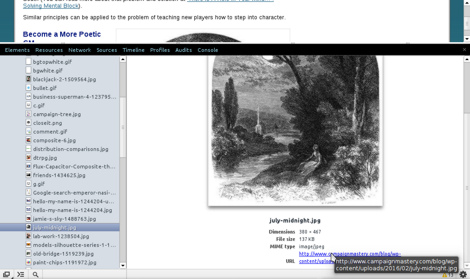
Using ‘Inspect Element’ > ‘Resources’ to hunt down a protected image (click on this preview for a larger image)
For example, a few weeks ago I used an illustration from an Edgar Allen Poe book of poetry to illustrate an article. As it happens, I credited the source as per the terms of usage; but if I had not, and wanted to do a Google search for a larger version, AND was blocked by ‘clever’ code from directly accessing the image, this method quickly identified it as “july-midnight.jpg” (I had to expand a couple of items in the left-hand pane) and found me the URL. Copy link address and image search, and you find 63 results. As it happens, the one that I have put online is the largest one that Google has indexed (even though I know that I reduced it in size from the original), but that’s neither here nor there.
With these tips and tricks, you should see an immediate increase in your Google-Fu for images! Go forth and Search…
Finding The Right Image
I rarely accept the first choice that comes up that “might” work. I will usually open from 5 to 10 results as “contenders” and make the choice from amongst those results. I may derive some possibilities from one search and more from another. Depending on the importance of the illustration to the adventure, I may spend anywhere from a few seconds to five or ten minutes choosing “contenders”; on very rare occasions, a quarter-hour.
It’s always good to have some criteria in mind for winnowing these shortlisted search results before you start, but essential to be flexible. Images that show personality, or convey a mood that matches what I want the mood to be at that moment in the adventure where the image is to be first displayed, tend to rate highly. Images with period-appropriate setting and clothing are also preferred over those that are somehow inappropriate, though images without period in-appropriate content also rate fairly highly in my book. Images that require less editing or manipulation are preferred over those that need substantial alteration, simply because this consumes time that can be spent elsewhere if it’s available. Style can be important; for the pulp campaign, a lot of standard sci-fi images are too realistic, even for mad scientist’s weird inventions. In the Zenith-3 campaign, there are three distinct contexts – a very slick and polished sci-fi look; a very grungy, dystopian sci-fi look; and a mid-80s look.
Rather than close tabs, I prefer to rearrange them in order – something chrome lets me do, but which not all browsers supports – so that the more preferred images are to the left and the least-preferred to the right. That lets me fall back on a “next best” choice if there is something about the preferred result that wasn’t initially noticed and that is a killer in terms of suitability. For location images in the Pulp campaign, that tends to be an over-abundance of electrical lines, power poles, modern street lights and modern street signs, and – sometimes hardest of all to cope with – air conditioning units in windows. Vehicle styles are also often a problem.
There are times when the best you can do is tell your players to ignore some inappropriate content, but a little effort avoids having to do so most of the time.
The Art Of Image Searching
There’s an art to choosing the right search term. Quite often, you will need to try two or three variations before you find exactly what you’re looking for, if it even exists at all. Like all arts, we learn by doing and get better with practice.
I can’t make you skilled in the practice of that art; but hopefully this article has given the information you need to make the fullest use of the tools at your disposal.

Comments Off on Finding Your Way: Unlocking the secrets of Google Image Search


